
When it comes to photography, depth of field is a concept that significantly impacts the quality and visual appeal of an image. For photography enthusiasts and professionals, mastering depth of field can transform ordinary shots into extraordinary works of art. In this article, we will delve deep into the concept of “Photeeq depth of field,” explaining its significance, how to achieve it, and its impact on photography.
What is Photeeq Depth of Field?
The term “Photeeq depth of field” refers to the area within a photograph that appears sharp and in focus. It defines the zone of acceptable sharpness that extends in front of and behind the subject. This concept is crucial for creating visually stunning images and guiding the viewer’s attention to specific elements within a composition.
Photeeq depth of field allows photographers to manipulate the focus range creatively. By mastering this technique, you can either isolate your subject with a shallow depth of field or ensure that every detail in your frame remains sharp with a deeper depth of field.
Factors Influencing Photeeq Depth of Field
Several factors influence the Photeeq depth of field in your photographs. Mastering these aspects will empower you to exercise greater creative control and enhance your imagery.
1. Aperture Size (f-stop):
The aperture size is one of the most significant factors affecting the Photeeq depth of field. A wide aperture (e.g., f/1.8) results in a shallow depth of field, where the background is beautifully blurred, and the subject remains sharp. Conversely, a narrow aperture (e.g., f/16) produces a deeper depth of field, ensuring that more elements within the frame appear in focus.
2. Focal Length:
The lens’s focal length plays a pivotal role in determining the Photeeq depth of field. Telephoto lenses (e.g., 200mm) naturally create a shallower depth of field, isolating the subject effectively, while wide-angle lenses (e.g., 24mm) provide a broader focus range, capturing more of the scene in sharp detail.
3. Distance to Subject:
The proximity of the camera to the subject is another crucial factor. The closer the camera is to the subject, the shallower the Photeeq depth of field becomes, emphasizing the subject against a softer background. Increasing the distance between the camera and the subject leads to a greater depth of field, with more of the image appearing in focus.
4. Sensor Size:
The size of the camera’s sensor significantly affects the Photeeq depth of field. Larger sensors, such as those in full-frame cameras, provide greater control and enable a more pronounced depth effect. Smaller sensors, like those in crop-sensor or compact cameras, generally offer less dramatic depth-of-field control but can still produce stunning results with the right techniques.
5. Subject and Background Composition:
The arrangement of elements within your frame also impacts the perceived Photeeq depth of field. A well-composed background can enhance the depth effect, drawing attention to the subject and adding visual interest.
How to Achieve Photeeq Depth of Field
Achieving the ideal Photeeq depth of field requires a blend of technical understanding, practice, and creative insight. By mastering the following techniques and concepts, photographers can unlock new levels of artistic expression and control:
1. Master Aperture Settings
Understanding aperture settings is fundamental to controlling depth of field. Use a wide aperture (e.g., f/1.4) for a shallow depth of field that isolates your subject with a blurred background. For scenarios demanding a deeper focus, such as landscapes, opt for smaller apertures (e.g., f/16 or f/22).
2. Choose the Optimal Lens
Selecting the right lens significantly impacts your Photeeq depth of field. Fast prime lenses, with wide apertures like f/1.8 or f/1.4, are ideal for achieving pronounced background blur and bokeh. Wide-angle lenses offer greater depth, making them suitable for scenes where you want more elements in focus.
3. Understand Focal Length Effects
The lens’s focal length directly affects depth of field. Telephoto lenses (e.g., 70-200mm) compress the scene, creating a shallower depth of field, perfect for isolating subjects. Wide-angle lenses (e.g., 16-35mm) capture more of the scene in focus, providing a broader perspective.
4. Fine-Tune Subject Distance
The distance between your subject and the camera plays a critical role. Move closer to your subject for a shallow depth of field that emphasizes the subject while softly blurring the background. Increase this distance to achieve a broader focus range, particularly useful for group or environmental shots.
5. Utilize Advanced Autofocus Techniques
For precise control over Photeeq depth of field, leverage your camera’s advanced autofocus capabilities. Use single-point focus for shallow depth scenarios, ensuring the focal point is precisely on your subject. Manual focus can be particularly effective when working with intricate compositions or macro photography.
6. Leverage Composition and Framing
Strategic composition enhances the impact of Photeeq depth of field. Position your subject against a distant background to maximize the blur effect, or use leading lines and framing elements to draw attention to your focal point.
7. Enhance Depth of Field in Post-Processing
Modern photo editing tools like Lightroom and Photoshop enable further refinement of depth of field effects. Use selective blurring to enhance background softness, or apply sharpening to make the subject pop. Advanced features, such as AI-assisted depth simulation, can replicate the Photeeq depth of field in images captured under less-than-ideal conditions.
8. Experiment with Light and Shadows
Lighting plays a vital role in complementing Photeeq depth of field. Soft, directional light enhances the bokeh effect, adding texture and dimensionality to your photos. Position your light source strategically to create depth and separation between your subject and background.
By integrating these techniques into your workflow, you can harness the full potential of Photeeq depth of field, crafting images that are both visually striking and emotionally resonant.

Achieving the desired Photeeq depth of field requires a combination of technique, equipment, and creative vision. Here are some practical tips:
1. Use the Right Aperture
Experimenting with different aperture sizes is one of the most effective ways to control the Photeeq depth of field. A wide aperture (e.g., f/1.4) narrows the depth of field, producing a beautifully blurred background. On the other hand, a smaller aperture (e.g., f/16) broadens the depth of field, capturing more elements in sharp focus.
2. Choose the Appropriate Lens
Selecting the right lens is critical for achieving the desired Photeeq depth of field. Prime lenses with wide maximum apertures (e.g., f/1.4 or f/1.8) are ideal for creating a dramatic shallow depth of field. Wide-angle lenses ensure a greater depth of field, perfect for landscapes.
3. Adjust Your Distance
The distance between your camera and the subject significantly impacts the Photeeq depth of field. Moving closer to your subject creates a shallower depth of field, while increasing the distance results in a deeper focus range.
4. Focus with Precision
Using manual focus or advanced autofocus modes ensures accuracy, especially with a shallow Photeeq depth of field. Locking focus on your subject’s eyes, for instance, enhances portrait photography.
Creative Applications of Photeeq Depth of Field
Mastering the Photeeq depth of field unlocks a myriad of creative opportunities for photographers, allowing them to craft images that evoke emotion and draw the viewer’s eye to key elements of the composition. Here are some innovative ways to harness this technique:
Portrait Photography
Using a shallow Photeeq depth of field is ideal for portraits, as it isolates the subject from the background. This effect enhances facial features and adds a professional, polished look. By adjusting aperture settings and focal lengths, photographers can create striking portraits with soft, dreamy backgrounds, emphasizing the subject’s expression and details.
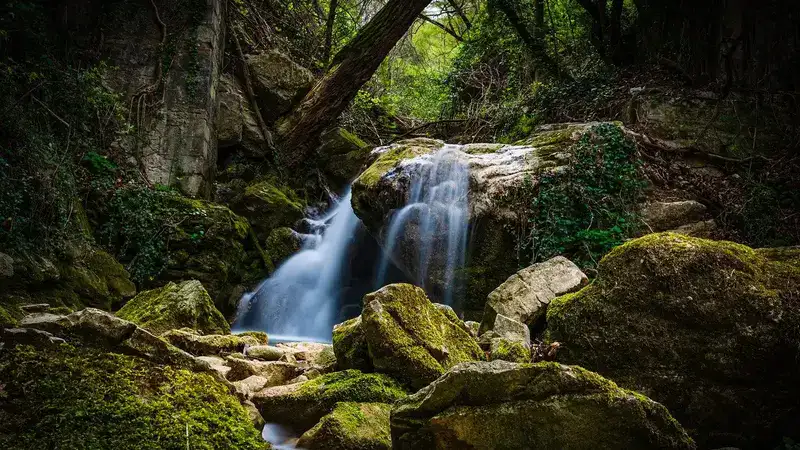
Landscape Photography
For landscapes, a deep Photeeq depth of field ensures clarity across the entire scene, from the foreground to the horizon. This approach captures intricate details, such as the texture of rocks, leaves, and distant mountains, offering a sense of depth and immersion in the photograph.
Macro Photography
In macro photography, where subjects are often small and intricate, a shallow Photeeq depth of field highlights the most important details, like the delicate veins of a leaf or the tiny facets of an insect’s eye. The blurred background ensures the subject remains the primary focal point, creating a visually compelling composition.
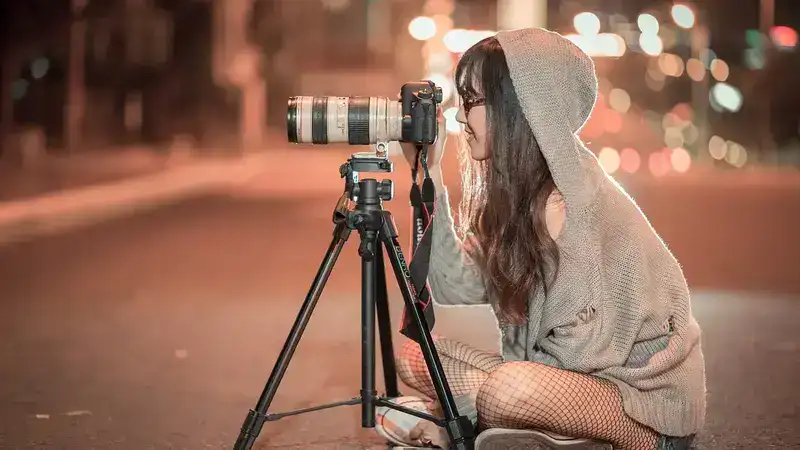
Street Photography
Street photography benefits from a balanced Photeeq depth of field. A shallow focus can highlight an individual amidst a bustling cityscape, while a deeper focus captures the energy and interplay of urban elements. This dynamic use of depth creates storytelling opportunities, adding drama and context to the images.
Food and Product Photography
Shallow Photeeq depth of field is a staple in food and product photography. By selectively focusing on key elements, such as the texture of a dish or the logo of a product, photographers can create images that are visually appealing and draw attention to the subject’s most compelling aspects. This technique is particularly effective for advertising and branding purposes.
Fine Art Photography
Fine art photographers often experiment with Photeeq depth of field to create ethereal and abstract images. By deliberately blurring certain elements while keeping others sharp, they guide viewers through a visual journey, evoking emotions and encouraging interpretation.
Event Photography
In event photography, such as weddings or concerts, Photeeq depth of field is used to isolate moments of significance. A shallow focus on the couple exchanging vows or a musician playing passionately draws attention to the most poignant parts of the scene, while the background fades gracefully.
By applying these creative approaches, photographers can make the most of Photeeq depth of field to craft images that are not only technically impressive but also artistically resonant. This powerful tool allows for endless experimentation and innovation, pushing the boundaries of what photography can achieve.

Mastering Photeeq depth of field opens up endless possibilities for creative expression:
Portrait Photography:
Shallow Photeeq depth of field isolates the subject from the background, emphasizing facial features and expressions.
Landscape Photography:
A deep Photeeq depth of field ensures that every element, from the foreground to the horizon, is sharp and detailed.
Macro Photography:
In macro photography, a shallow Photeeq depth of field highlights intricate details of tiny subjects, such as insects or flowers, while softly blurring the background.
Street Photography:
Balancing shallow and deep Photeeq depth of field in street photography can tell compelling stories. Highlighting a subject amidst a busy background adds a dramatic touch.
Food and Product Photography:
Shallow depth of field emphasizes key elements, such as texture or branding, creating visually appealing images for advertising.
Equipment for Enhancing Photeeq Depth of Field
Investing in the right equipment is paramount for photographers looking to maximize the potential of Photeeq depth of field. The following tools are essential to enhance control and creativity:
1. Prime Lenses
Prime lenses with wide maximum apertures (e.g., f/1.4 or f/1.8) are ideal for achieving shallow Photeeq depth of field. These lenses provide exceptional clarity and allow for precise subject isolation, making them a go-to choice for portrait, macro, and fine art photography.
2. Zoom Lenses with Variable Aperture
Zoom lenses with a constant wide aperture (e.g., f/2.8) combine flexibility with depth-of-field control. These lenses are versatile for scenarios where changing focal lengths is necessary, such as event or wildlife photography.
3. Tripods and Stabilization Tools
Tripods ensure stability, especially when shooting with narrow apertures in low-light conditions. Stability is critical for achieving sharpness and avoiding motion blur, both of which impact the perception of depth.
4. Neutral Density (ND) Filters
ND filters are invaluable for controlling light exposure during daytime shoots. They enable the use of wide apertures without overexposing the image, preserving the ability to create shallow depth-of-field effects under bright lighting.
5. Macro Lenses
For close-up and macro photography, specialized macro lenses provide excellent control over depth of field. These lenses allow photographers to focus on intricate details, such as textures and patterns, while maintaining creative background separation.
6. Mirrorless Cameras with Advanced Focus Modes
Modern mirrorless cameras with advanced autofocus and focus peaking features offer enhanced precision. These systems are particularly useful when working with extremely shallow Photeeq depth of field, as they help ensure critical focus on the intended subject.
7. Remote Shutter Releases
A remote shutter release minimizes camera shake during long exposures or when using narrow apertures. This tool is especially useful for landscape and architectural photography where deep Photeeq depth of field is desired.
8. High-Quality Light Sources
Portable lighting solutions, such as LED panels or external flashes, enhance the ability to control shadows and highlights. Proper lighting accentuates the depth effect by emphasizing subject separation and adding dimensionality.
9. Post-Processing Software
While not physical equipment, advanced software like Adobe Lightroom or Photoshop is integral to refining Photeeq depth of field. These tools allow photographers to blur or sharpen specific areas, enhancing the natural depth effect captured in-camera.
10. Specialty Lenses and Adapters
Tilt-shift lenses and lens adapters expand creative options for manipulating depth of field. Tilt-shift lenses are particularly effective for architectural photography, enabling precise control over focal planes.
By integrating these tools into your photography arsenal, you can fully harness the artistic potential of Photeeq depth of field, achieving remarkable images that captivate and inspire.
Investing in high-quality equipment is essential for mastering the nuances of Photeeq depth of field:
1. Prime Lenses:
Prime lenses with wide apertures (e.g., f/1.4 or f/1.8) are excellent for achieving a shallow Photeeq depth of field.
2. Tripods:
Using a tripod ensures stability, which is essential for capturing sharp images, especially with a narrow aperture.
3. Neutral Density (ND) Filters:
ND filters allow you to shoot with wide apertures in bright conditions without overexposing your photos.
4. Macro Lenses:
For close-up shots, macro lenses provide exceptional control over the depth of field.
Photeeq Depth of Field: Common Mistakes to Avoid
When working with Photeeq’s depth of field, photographers often encounter several common pitfalls that can impact the quality of their images. Below are some key mistakes to watch out for, along with tips on how to avoid them:
-
Overusing Shallow Depth of Field:
While the shallow depth of field effect can create stunning blurred backgrounds that isolate your subject and add a professional touch, overusing this technique can lead to a monotonous style. If every shot is captured with a heavily blurred background, your images might lack variety. To avoid this, consider using Photeeq’s depth of field features in moderation. Experiment with different focal lengths, apertures, and compositions to keep your photos dynamic and varied.
-
Neglecting the Background:
A shallow depth of field can make your subject stand out beautifully, but the background plays a crucial role in complementing the subject. Even when using Photeeq’s advanced depth of field features to blur the background, make sure that the background elements add to the overall aesthetic rather than distract from it. Pay attention to background colors, textures, and patterns. Ensure that they don’t clash with the subject, and avoid cluttered backgrounds that can take away from the focal point of the image.
-
Incorrect Focus:
One of the biggest mistakes when using Photeeq depth of field tools is missing the focus, especially on the critical parts of the subject. A slight error in focus can render your image less sharp, and in some cases, the photo may appear blurry. To avoid this, always double-check your focus settings. Photeeq provides tools like focus peaking and magnification to help you pinpoint and confirm sharpness in the most important areas of your shot. Whether you’re focusing on a model’s eyes or the fine details of a product, ensuring correct focus is essential to achieving a high-quality result.
-
Not Adjusting for Different Lighting Conditions:
Lighting plays a crucial role in how your depth of field appears in your images. Photeeq depth of field tools allow you to adjust your settings for optimal exposure, but you should also take lighting into account. In bright environments, the shallow depth of field may cause overexposure, while in dimly lit scenes, it may result in underexposure. Always adjust your aperture, ISO, and shutter speed in combination with your depth of field settings to maintain proper exposure.
-
Forgetting to Consider the Subject’s Movement:
When using Photeeq’s shallow depth of field, a moving subject can blur the image unintentionally, ruining the effect. The narrow focus plane can be challenging to track, especially if the subject is in motion. To avoid this, use faster shutter speeds or select a larger depth of field to capture motion while keeping the subject sharp.
By being mindful of these common mistakes, you can take full advantage of Photeeq’s depth of field features to create photos that are both technically precise and artistically compelling. Whether you’re shooting portraits, landscapes, or macro photography, balancing your depth of field techniques will ensure that your images stand out for all the right reasons.
Photeeq Depth of Field in Post-Processing
Post-processing tools can enhance the Photeeq depth of field effects in your images:
Blurring Backgrounds:
Software like Adobe Photoshop or Lightroom lets you blur backgrounds selectively, simulating a shallow Photeeq depth of field. This allows you to isolate your subject by creating a blurred background similar to what you’d achieve using Photeeq in-camera settings. While software tools are effective, they can’t fully replicate the natural, organic blur transitions Photeeq depth of field provides during capture.
Sharpening Subjects:
Use sharpening tools to enhance the subject’s details and bring it into sharper focus, especially when working with Photeeq depth of field. This helps make the subject stand out clearly against a blurred background. Applying selective sharpening ensures that key areas, like facial features or textures, remain crisp while maintaining the smooth bokeh effect in the background.
Simulating Bokeh:
Simulate bokeh effects to create a dreamy, artistic feel, mimicking the shallow Photeeq depth of field. This technique blurs the background while keeping the subject in focus, adding depth and visual interest. Photeeq’s depth of field allows for smoother, more natural bokeh, enhancing your photos with a professional touch.
The Science Behind Photeeq Depth of Field
Conclusion
Mastering “Photeeq depth of field” is essential for photographers aiming to elevate their craft. By understanding the factors that influence it and applying the right techniques, you can create stunning, professional-quality images that capture attention and tell compelling stories.
Whether you’re a budding photographer or an experienced professional, Photeeq depth of field offers endless opportunities for creative exploration. Practice, experiment, and let your imagination guide you in harnessing this powerful photographic tool. Remember, the key to exceptional photography lies in the perfect balance of technical expertise and artistic vision. See more,